

Let’s start with a quick and easy overview of what CORS really is.
CORS stands for Cross-Origin Resource Sharing. It is a mechanism that allows resources to be requested from an application running on a different domain than the one from which they originated. In other words, it enables web pages to access data and resources from other domains.
To better understand how CORS works, it’s helpful to look at a diagram. Consider a web page hosted on Domain A that wants to request data from a server hosted on Domain B.
When Domain A makes an HTTP request, the browser asks the server on Domain B if it can send the request from Domain A. This confirmation request is called a Preflight request (We will deep dive into it more in a later section of the article).
The server on Domain B confirms whether it accepts requests from Domain A or not through CORS Headers (e.g. Access-Control-Allow-Origin, Allow-Control-Allow-Method, etc) Once the preflight request is successful, the browser makes the request to Domain B.
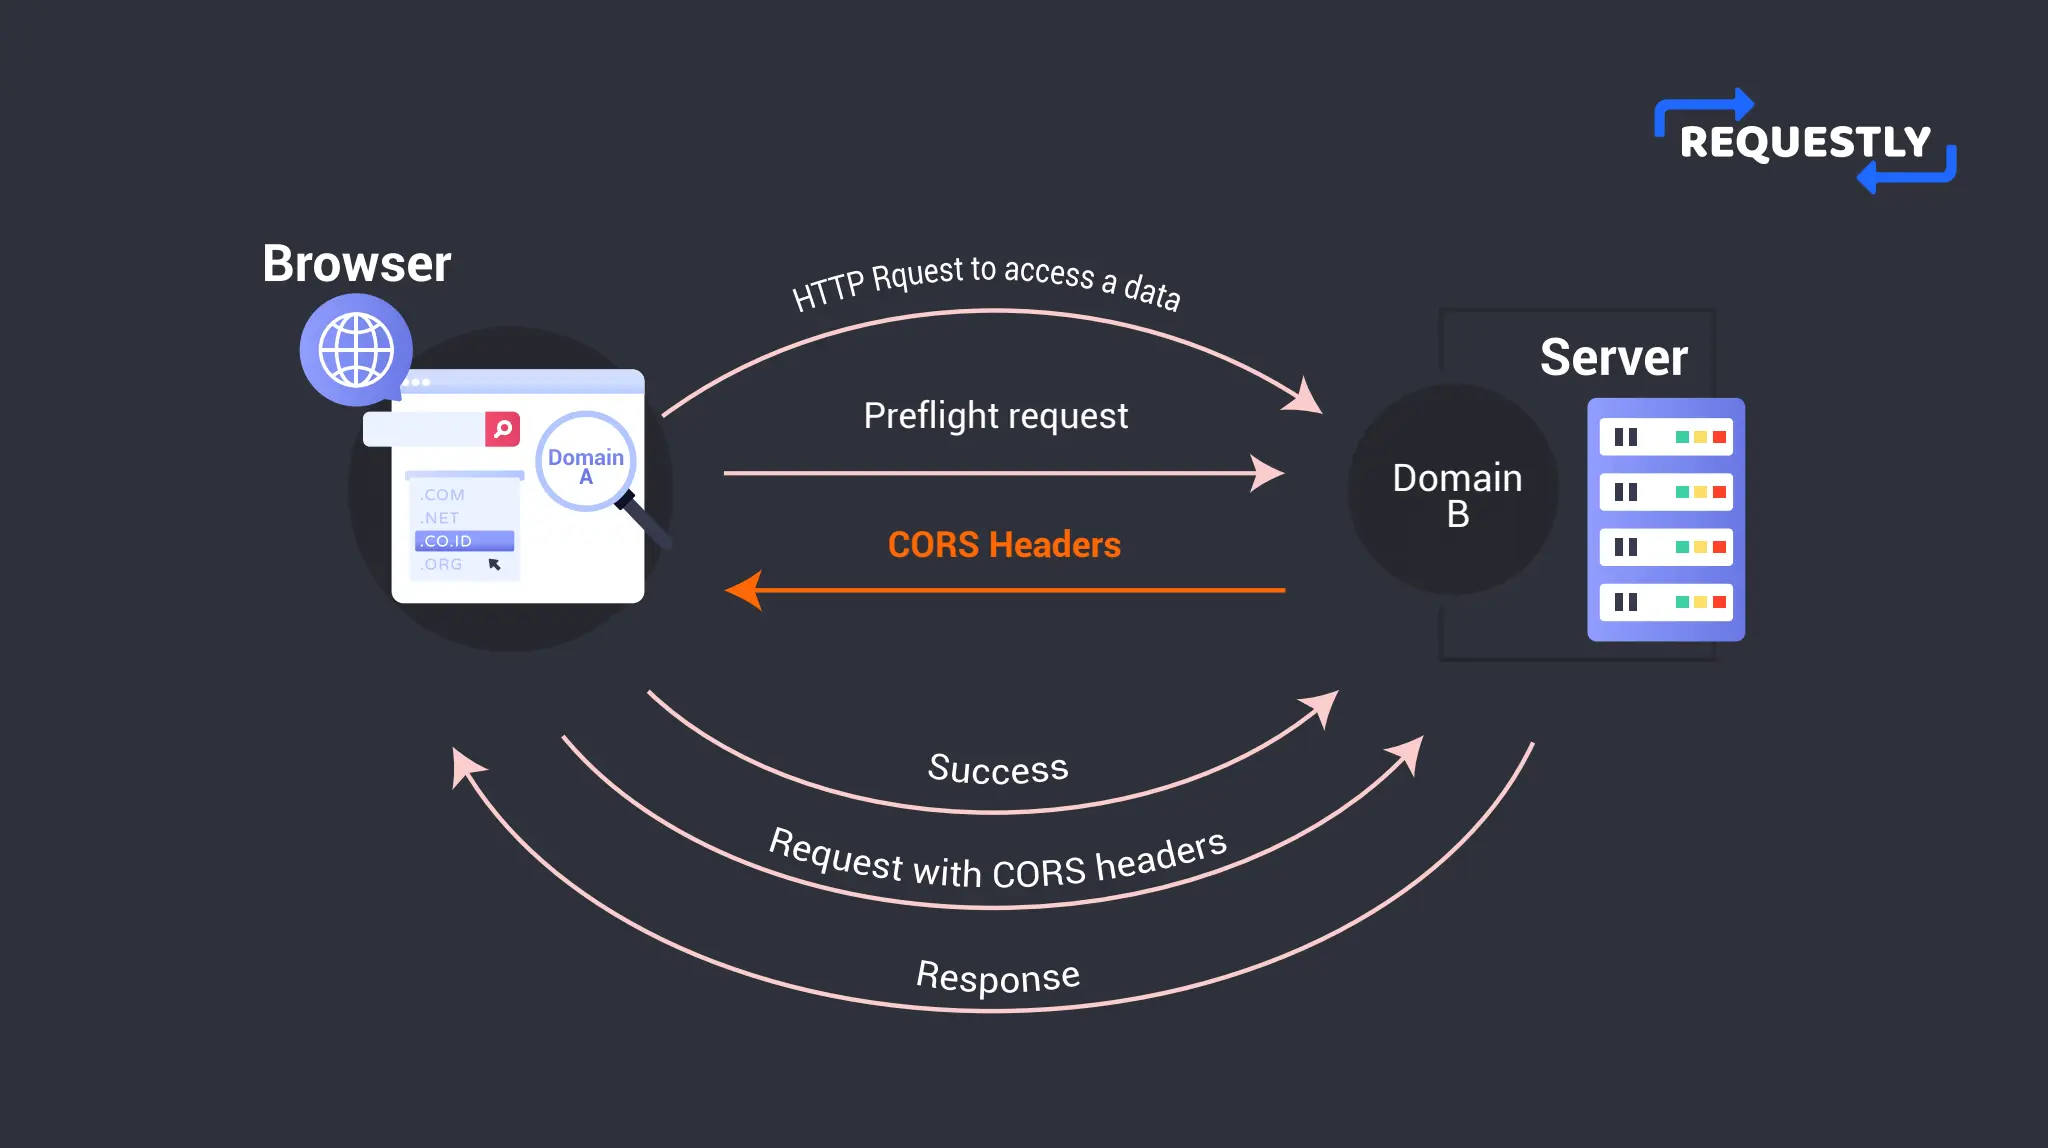
Let’s say in another scenario the server on Domain B didn’t allow any requests from Domain A. In that case, the browser blocks the request and returns an error. Hence Domain A is unable to access the said resource from the server on Domain B.
That’s precisely what CORS is. To unravel the internals of how and why Browsers play such a major role in CORS, let’s dig a little deeper into CORS now.
Brief History of CORS
CORS was introduced by W3C or World Wide Web Consortium (an international community that develops standards for the World Wide Web) as a solution to the same-origin policy limitations.
The same-origin policy restricts communication between any two websites on a different origin or puts simply different domains. CORS would allow a server to specify which domains it would explicitly give access to. This gives the server more control over what applications or websites it wants to communicate with.
CORS was introduced as a way to bypass the above same-origin policy in a number of scenarios. When your frontend applications need to communicate with a backend service on a different domain, it’s because of CORS that such communication is possible.
But what is this same-origin policy and what does it do?
The Same-Origin Policy
Browsers act as the intermediary interface between a web application and the internet. Once an application is out there on the internet, any other application, website or server can communicate with it. However, in order to make sure that malicious websites and attackers don’t use this to access data from other sites, browsers by default implement a same-origin policy.
This same-origin policy states that two applications will only be allowed to communicate if they’re of the same origin.
What constitutes the Origin?
Origin consists of three elements:
- the protocol (such as HTTP or HTTPS),
- the domain name, and
- the port number of a web page’s URL.
Security Benefits of Same-Origin Policy
To get a real sense of how the same-origin policy ensures security, let’s take an example.
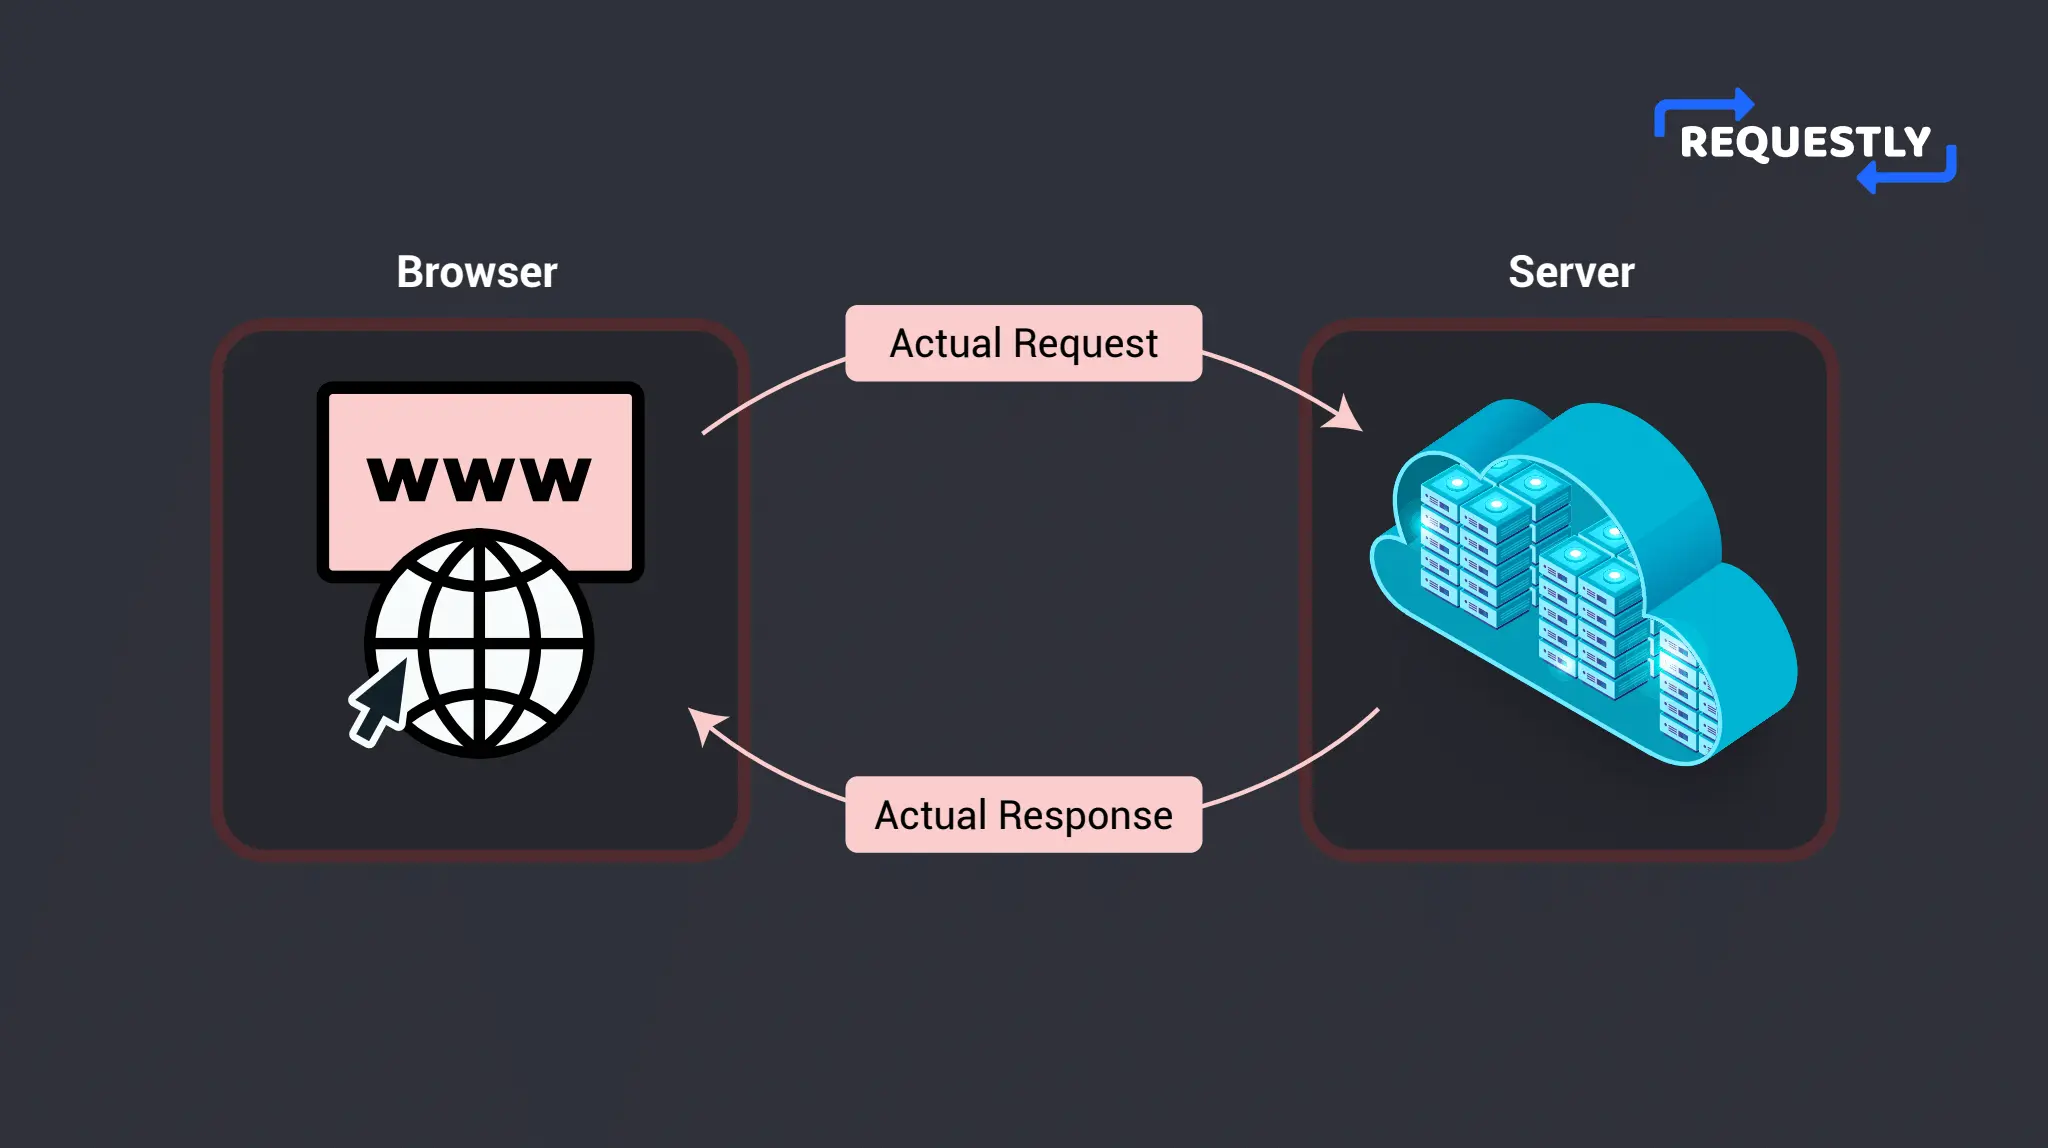
Imagine you are logged into your bank account on one of your browser tabs. Now, you click a link that navigates you to a different website in another tab. Due to the same-origin policy, the new website will not be able to access the contents of your bank website. Thus any malicious websites are prevented from stealing sensitive information from other websites that you may be logged into.
Here’s a better way to visualize the above:

By limiting the interactions between different origins, the same-origin policy helps to prevent a wide range of attacks, such as cross-site scripting (XSS) and cross-site request forgery (CSRF), which could otherwise be used to compromise the security and privacy of your users.
Why you need CORS?
The same-origin policy prevents applications from a number of security issues, but it also restricts communication between different applications and servers in a number of practical use cases.
For instance, let’s say you have an application where your backend server runs on domain1.com . You’re now working on some breaking changes on the front end and wish to do some rigorous testing before you push out your changes to production. So you deploy your changes to a frontend staging server, which is on domain2.com.
Due to the same origin policy, your browser won’t let your frontend staging server interact with your backend server. That’s a very common use case that CORS helps to solve. CORS will tell the browser that your server on domain1.com is allowed to respond back to HTTP requests from domain2.com.
However, any HTTP requests aren’t directly evaluated for CORS by the browser. There’s a special request that the browser sends to the server first to understand if CORS is enabled by the server. Let’s understand these requests in detail.
Preflight Requests
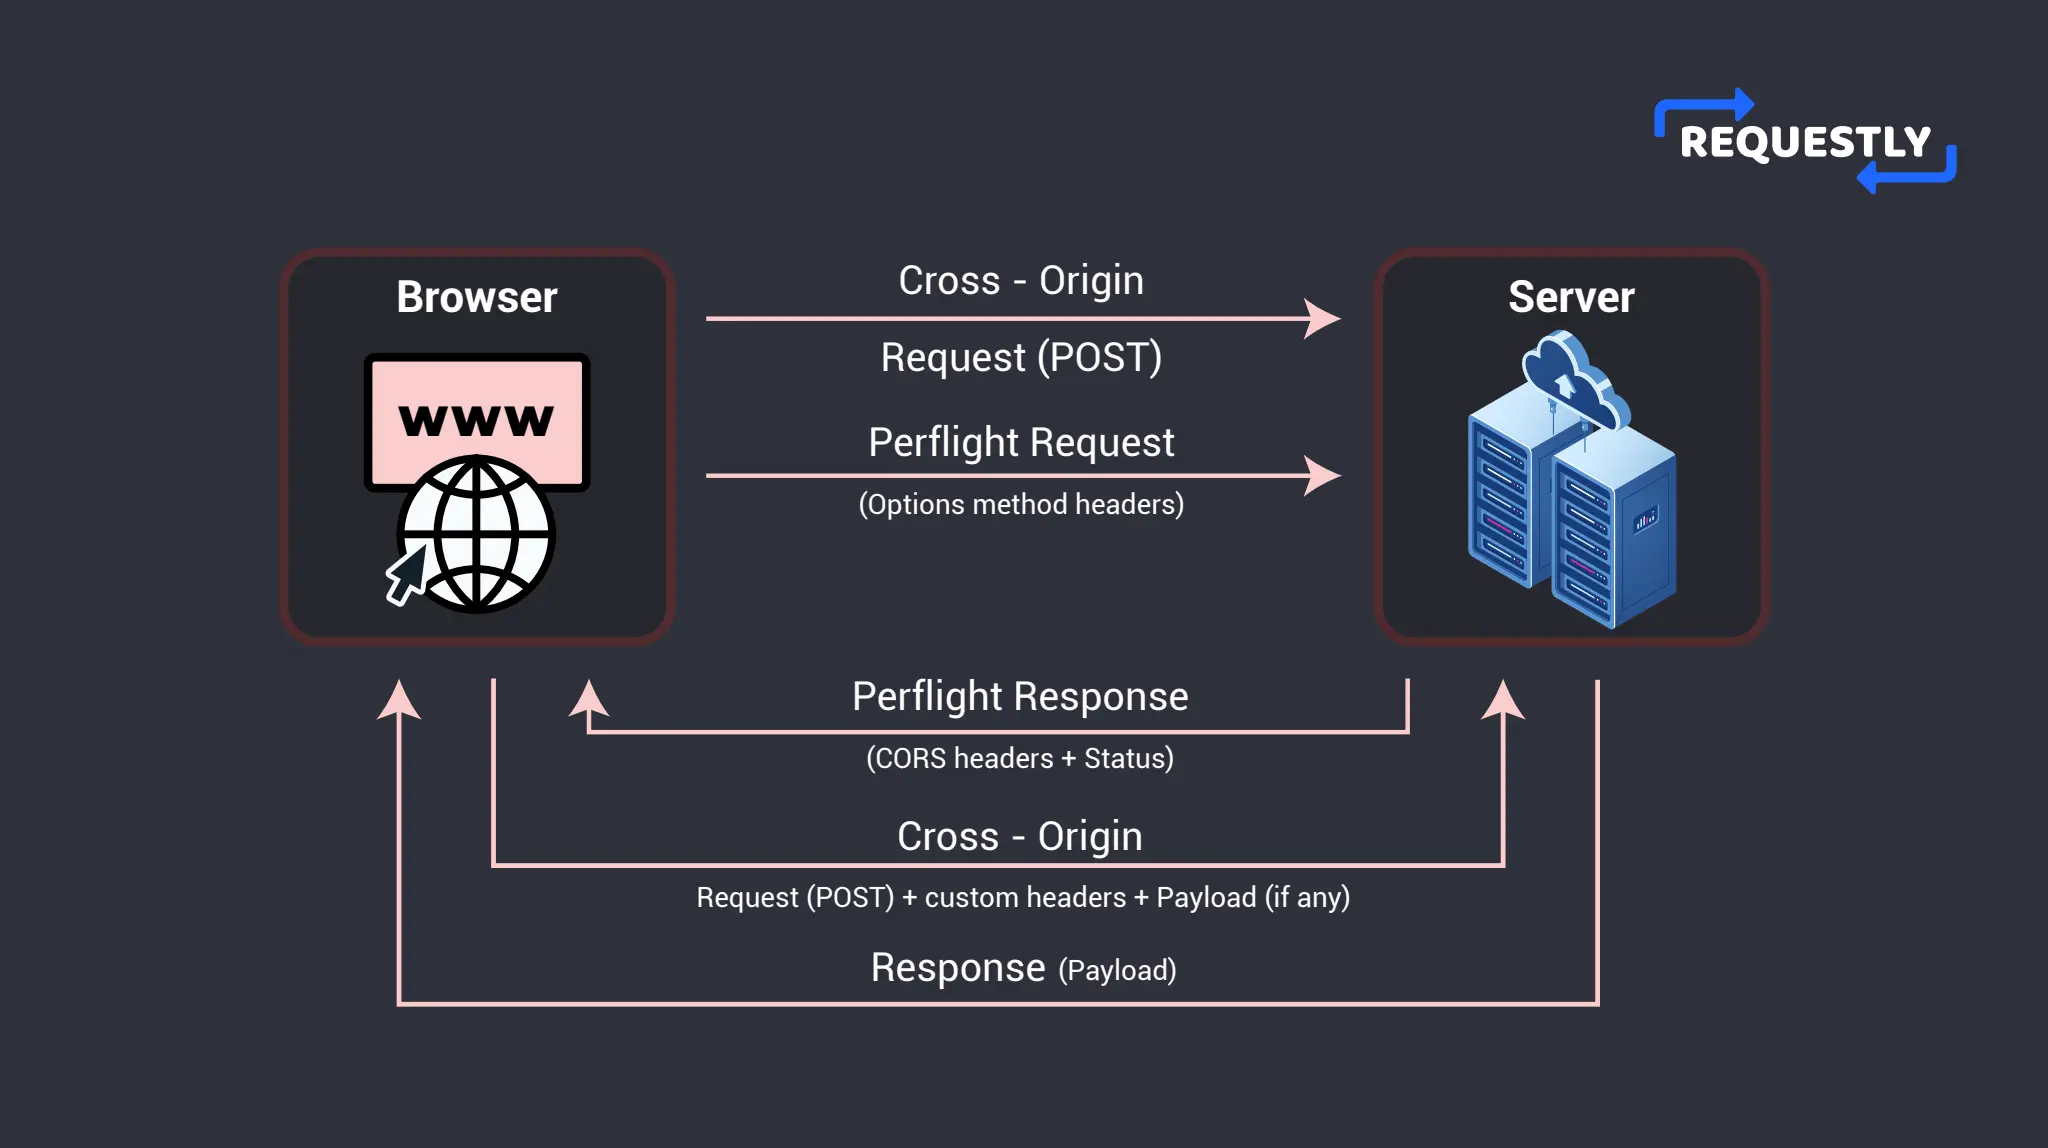
In the previous example, an application is making a cross-origin request to a server on a different domain. Before this request is sent to the server, the browser sends an HTTP OPTIONS request to the server. This is a special request sent by the browser and not the application that wants to communicate with the server. This special request is called a preflight request.
The purpose of the preflight request is to determine whether the cross-origin request is allowed by the server. It’s just a way for the browser to understand if the original request can be sent or not.
Usually, preflight requests happen when you use custom headers or HTTP methods other than GET and POST. Otherwise, the preflight request is omitted by the browser and the original request is sent as it is.
How a Preflight Request Works
The preflight request follows a specific flow.
The server checks which methods, headers and content-types are allowed for the requested resource. Once that’s evaluated, the server responds accordingly with appropriate Cross-Origin Resource Sharing (CORS) headers. These headers specifically indicate whether the cross-origin request is allowed or not. We’ll dive deeper into these CORS headers later in the post.
By making necessary changes in your server, you can allow these preflight requests and ensure that the applications which want to access resources from your server can do so without violating the same-origin policy.
Now that we’ve understood all the underlying principles involved, let’s form a bigger picture of what CORS is and how it works.
How does CORS work?
CORS by itself is a mechanism or a system that allows applications to make cross-domain requests in a controlled manner. It works by adding a specific set of HTTP headers to the request and response that clearly indicates to the browser that any cross-origin request to a specific domain is allowed.
CORS relaxes the Same-Origin Policy to allow cross-origin requests. There are two types of requests that work with CORS- Simple Requests and Preflight Requests. Simple Requests are HTTP GET and POST requests that do not trigger a Preflight Request. They are more straightforward and also faster because the original request is directly sent by the browser and CORS is evaluated by the server before sending the response.
However, Simple Requests have limitations such as not being able to set custom headers or use HTTP methods other than GET and POST. For custom headers and HTTP methods other than GET and POST, there are the Preflight Requests. The server sends these requests before making the actual request to ensure that the server allows the request.
When a CORS request is made, the server must respond with specific HTTP headers that allow the browser to verify if the request is allowed or not. These specific headers are also known as CORS headers.
The most important CORS header is the Access-Control-Allow-Origin header. The value against this header specifies the domains that are allowed to make cross-domain requests. Other than that, there are also headers like Access-Control-Allow-Methods and Access-Control-Allow-Headers. They specify the HTTP methods and headers that are allowed for the request.
CORS Headers
Now let’s look at some of the important and most commonly used CORS headers.
Your server must set these headers in the response to the cross-origin requests that you receive. Which headers should be used where depends widely on the request type and what type of resource the server wants to send. In almost all cases, you’d absolutely need to use the Access-Control-Allow-Origin header since it’s the most important one.
If you want to incorporate a preflight request, then you should use the Access-Control-Max-Age header to cache the preflight request accordingly. For this cached period, the browser won’t make the preflight request again.
Observing CORS in action
Enough theory, let’s take a look at CORS error in real life. It’s actually quite easy to reproduce a CORS error so we’ll create a simple NodeJS server without CORS enabled. That should give any frontend that tries to access our server a CORS error.
Here, I have a file app.js with a server and a simple endpoint that sends back some response:
In the above code, we have an endpoint /cors that returns a JSON message. However, we are not specifying any CORS header in the response so any request from an application on the browser should be disabled due to CORS.
I have deployed this app here and now I’ll try to hit this endpoint from Hopscotch.io:
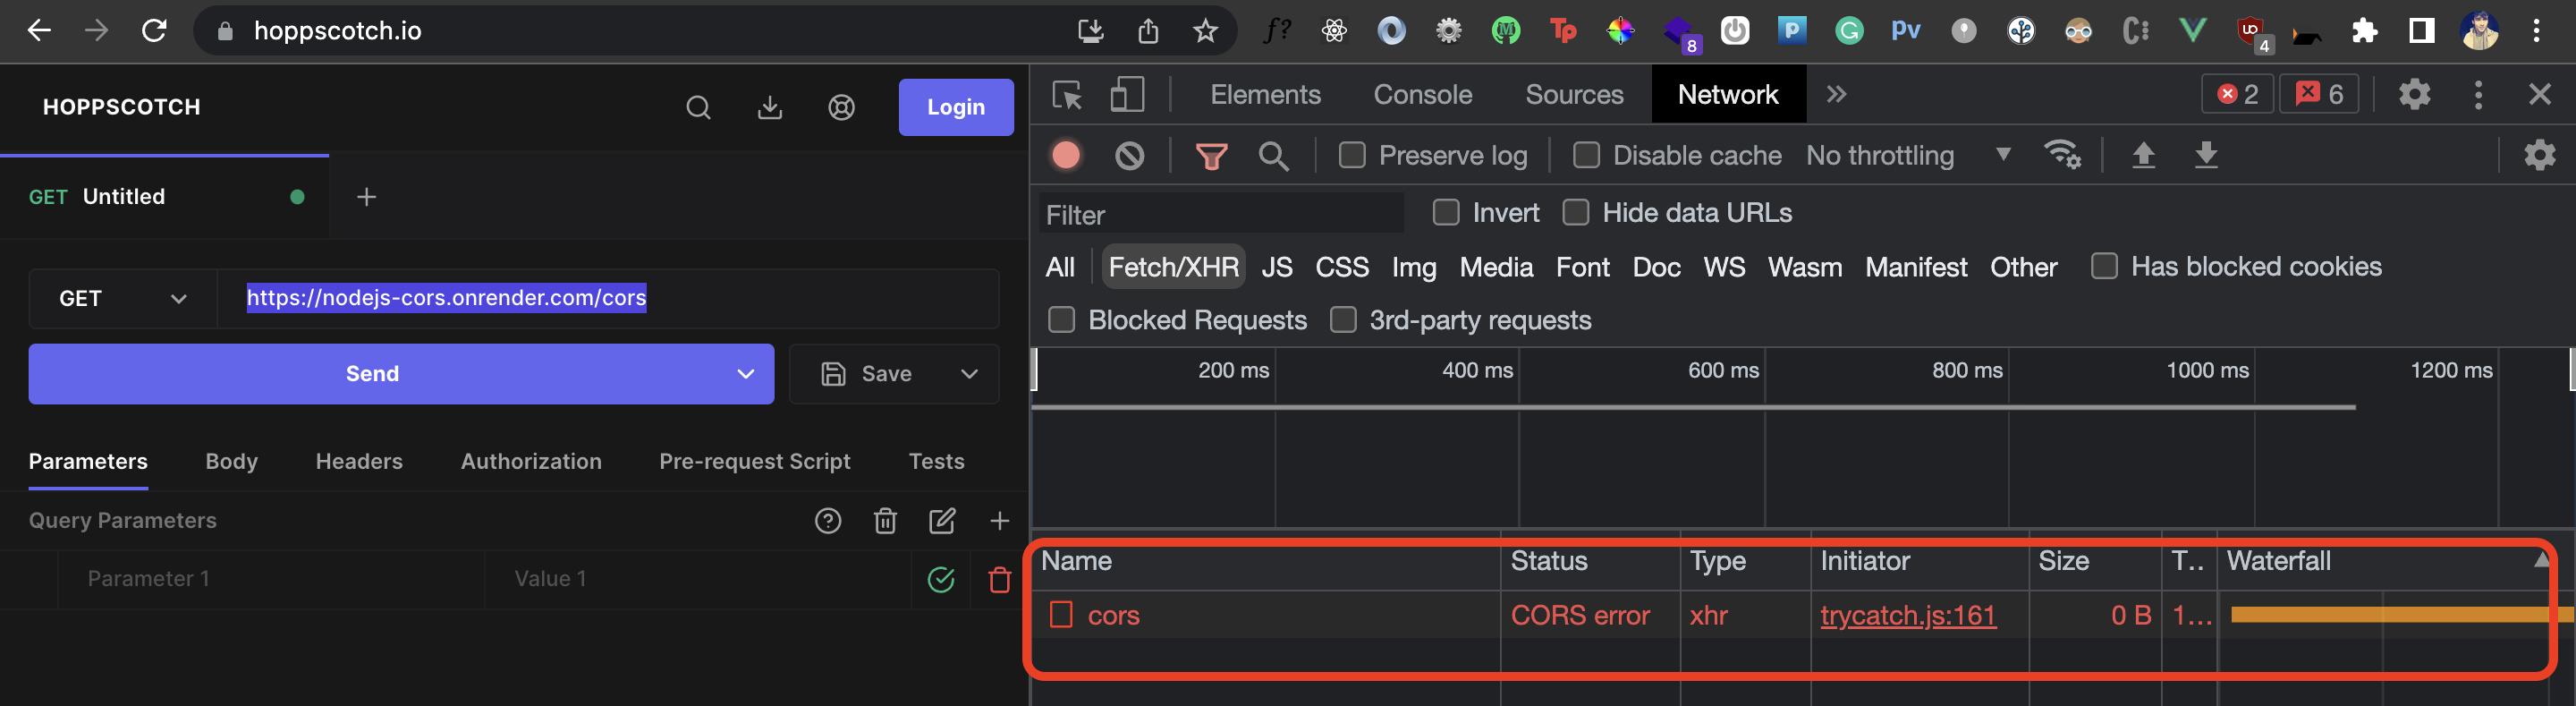
As you can see, Hopscotch doesn’t get a response back because the API doesn’t have CORS implemented and hence we get the CORS error. This would be the case for any application that tries to access this API from the browser.
So how do we get around this problem and fix the CORS issue?
How to handle CORS in local development & testing
If you have access to the server, the best way to fix the CORS issue is to add the relevant CORS headers in your API’s response. We’ll get to that in a minute.
Using Requestly
In a lot of cases, you won’t have access to the server. For instance, if you wish to access a third-party API that doesn’t have CORS enabled, you can use Requestly to solve CORS issue on your local machine or browser.
To demonstrate, I’m using the Requestly browser extension that you can install from here. We’ll create a new Modify HTTP Header’s rule. Under the Response Headers tab we’ll add the Response Header Access-Control-Allow-Origin and set it’s value to https://hopscotch.io. In the URL section, we’ll specify the domain of our NodeJS server.

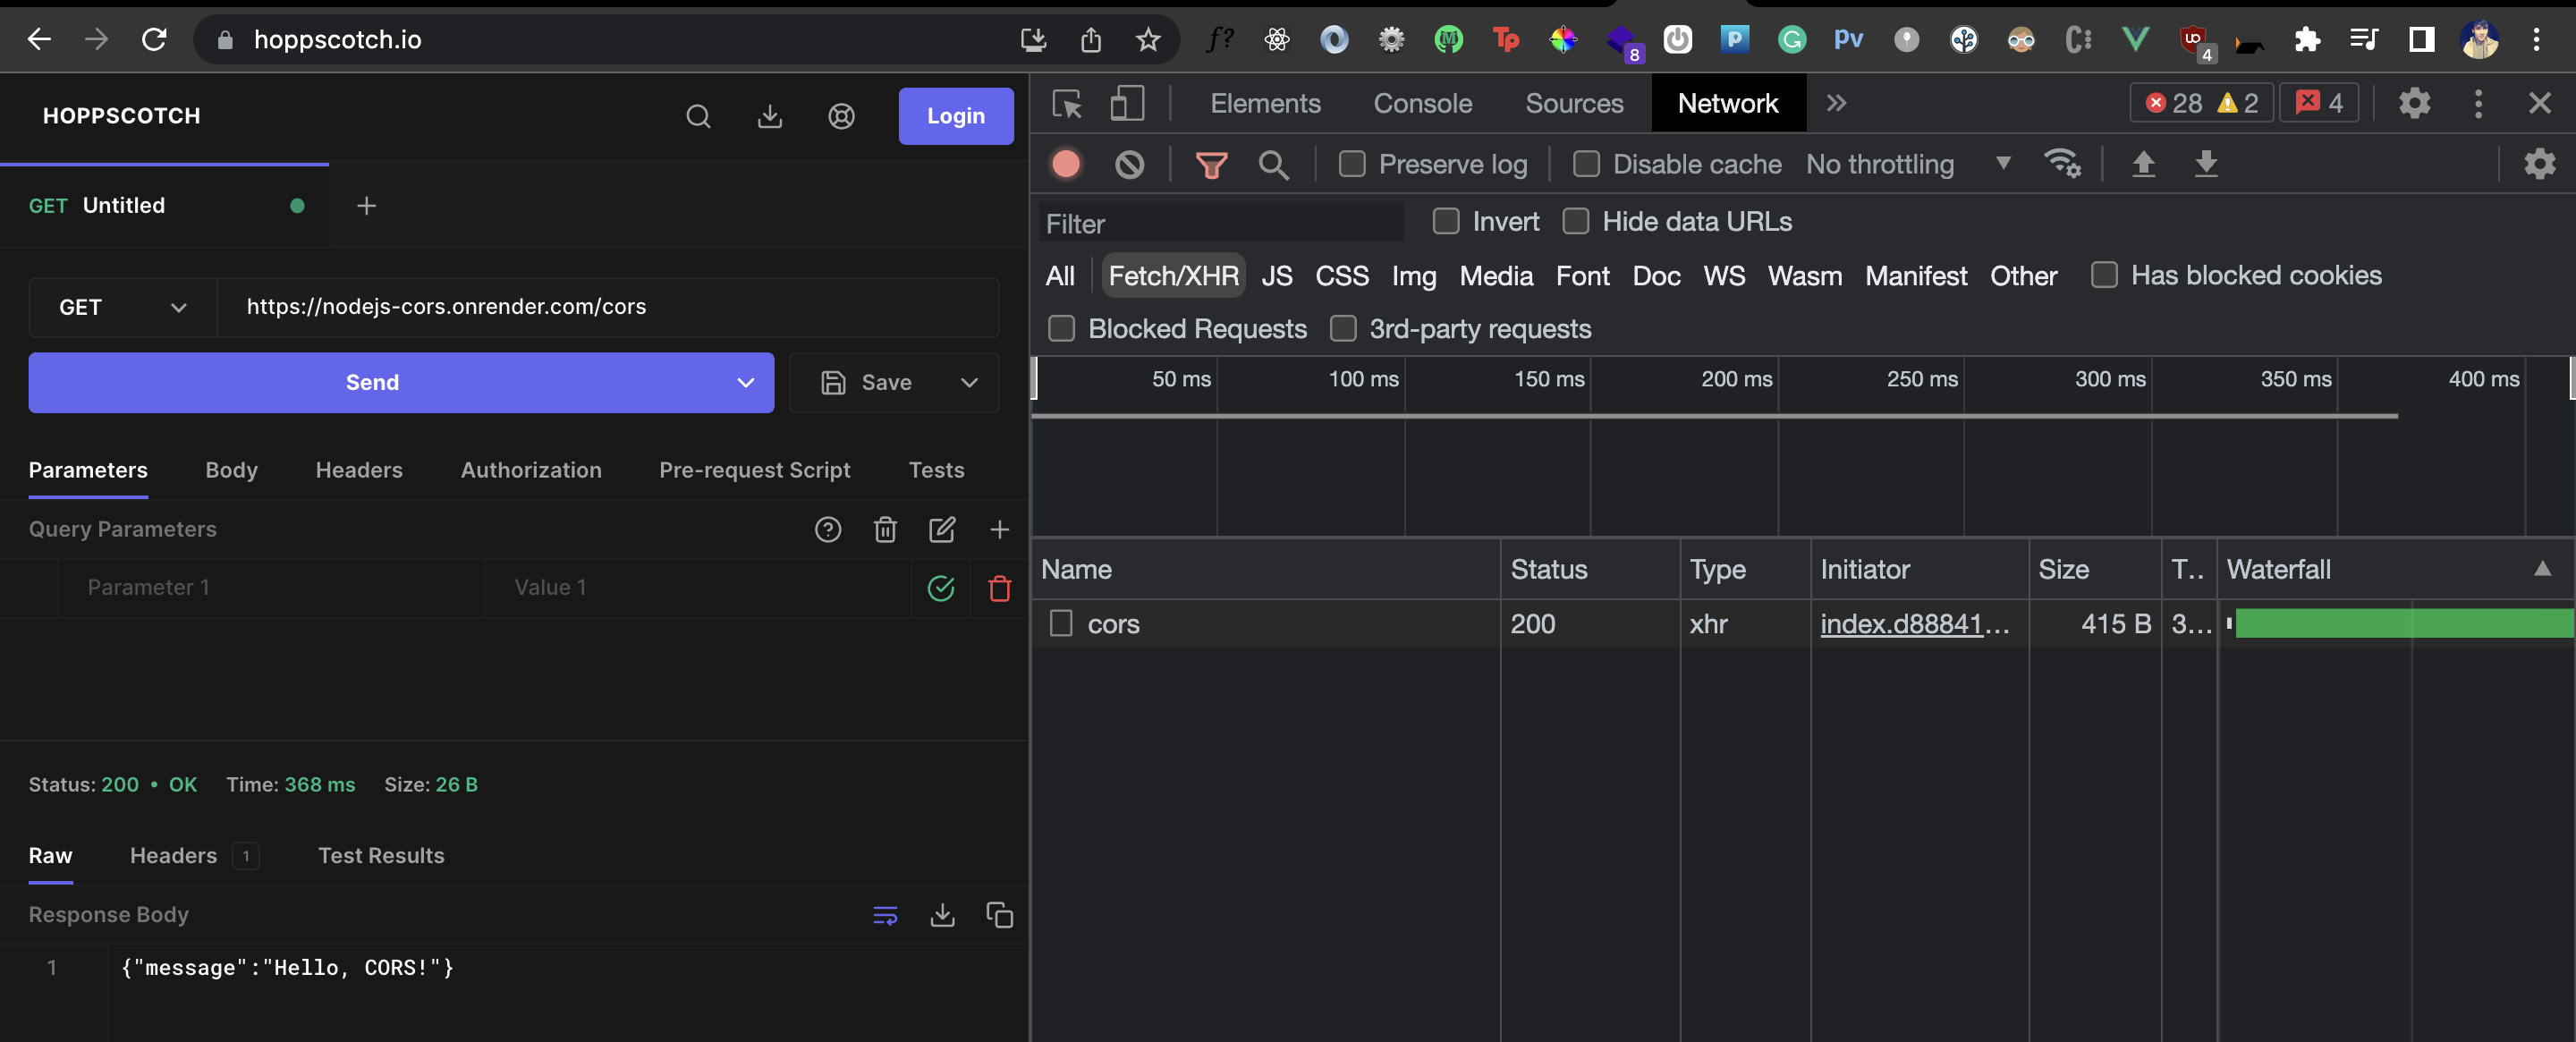
With the above configuration, the browser will now feel like the NodeJS API we built is actually allowing Hopscotch to make this request. So, let’s go back to Hopscotch and make the request again:
We get back the response from our API and no longer see the CORS error.
A tool like Hopscotch helps us make an HTTP request to any server directly through the browser. So the Hoppscotch client itself makes the HTTP request and since it now needs to go through the browser, the same-origin policy kicks in when we make this request. So if the server doesn’t have CORS enabled, Hopscotch doesn’t get a response back from the request.
Likewise, we have a covered how postman handles CORS in a separate post. You can read it from here.
Add CORS Support in your NodeJS server
If it’s your own server or you have access to server-side code, the best way to fix the CORS problem is to set the relevant CORS header in the response to your requests. So we add the following CORS headers that we’ve already seen previously as shown below:
Notice that we also handle the OPTIONS request for the preflight requests that are sent to the server. The above code now enabled CORS in our server for all requests of the origin https://hopscotch.io.
Now we don’t need to use any external tool to bypass the CORS issue from the origin https://hopscotch.io.
Conclusion
Next time you run into a CORS error, you have more than one way to solve it! Despite the nuance, CORS might land you in, remember that it’s an essential element to have control over how web applications interact on the internet. The concept of same-origin policy is imperative to have secure client and server communication.
You can check out the example code we used for CORS here. While you’re learning about CORS and CORS headers, check out this article where I talk about other common HTTP headers you can learn about.


