

HTTP headers play a vital role in the communication between your application and other web servers. They, in turn, help you control various behaviour in your web application.
When you understand details like CORS, Content Security Policy, X-Frame-Options, etc you can also prevent XSS attacks and clickjacking and enhance the security of your web application. Further, some headers like Cache-Control and Content-Encoding can help you boost the performance of your application. Using the relevant header appropriately can also enhance platform support and cross-browser compatibility of your application. When testing and debugging applications, you can use Requestly to easily modify headers and other aspects of HTTP requests and responses that pass through the browsers.
Despite all these advantages, HTTP headers are often the most overlooked and least talked about in web development. So in this blog, we’ll talk about 10 HTTP headers that every web developer should know. You’ll understand what these headers are, how to use them along with the benefit they provide.
CORS Headers
CORS stands for Cross-Origin Resource Sharing. It’s a default security feature implemented by browsers that helps to protect any sensitive data on your application. Through CORS, browsers by default block any requests from an application or a server that’s hosted on a different domain than your own application.

Set up CORS headers in a web application
Let’s see how to set up CORS headers in your web application. Say that, you have a NodeJS application and you wish to setup CORS headers for it, this is how you’d do it:
In the above example, we simply use the cors package to enable CORS in our Node.js web application. Further, you can also specify which domains are allowed to access your API by setting the Access-Control-Allow-Origin header.
Let’s say you wish to allow requests from requestly.io and postman.com, you can then set the Access-Control-Allow-Origin header like this:
Now all requests from requestly.io and postman.com will be able to access your application/API. For keeping the security of your application intact, you should only enable CORS for selected and trusted applications.
Common use cases for CORS headers
A major use-case for CORS headers is when you need a staging frontend server to access your APIs that are hosted on a different domain. You can also use it if you’re developing an open API or wish to give certain applications access to your API.
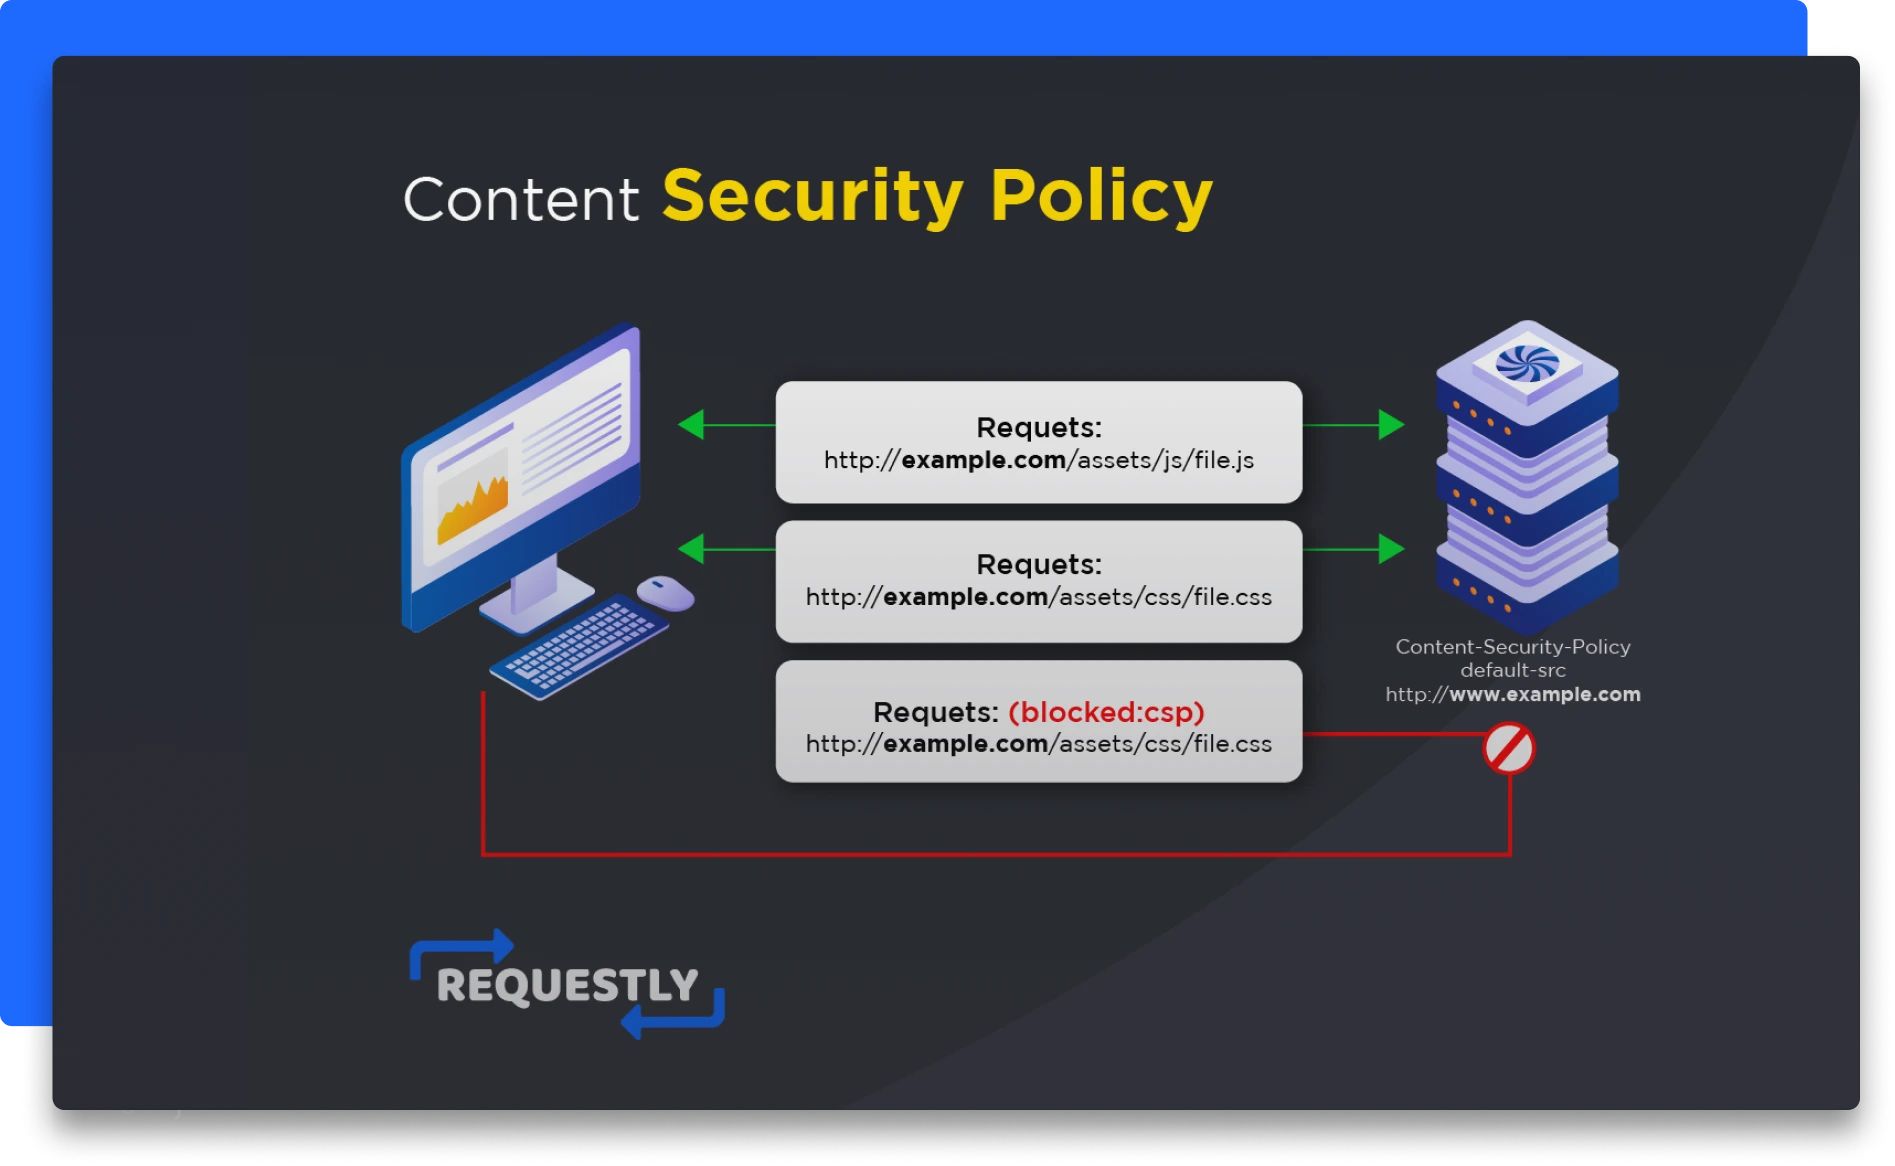
Content Security Policy
Since we’re touching base on security, let’s also look at another security feature that helps to prevent cross-site scripting (XSS) attacks.
With Content Security Policy (CSP), you can specify which set of resources or content such as scripts, stylesheets, and images your application can load.
How to set up CSP headers in a web application
Let’s say you wish to specify the Content-Security-Policy header such that JavaScript files can only be loaded from your own application and www.requestly.io domain. Here’s how you can do that:
Thus any other script, images, etc from another domain will not be loaded by your application.
Benefits of using CSP headers
The most important benefit of using CSP headers is preventing various types of XSS attacks, including inline scripts, eval, etc.
Common use cases for CSP headers
CSP headers are commonly used by web applications that allow user-generated content, such as forums and social media platforms. They can also be used by e-commerce websites to prevent payment information from being leaked to unauthorized third-party domains.
You can use Requestly to bypass content-security-policy or test different values of content-security-policy for testing your code on your client sites.
X-Frame-Options

Another HTTP header that acts as a security feature for your application is the X-Frame-Options. You can use it to specify if a third party website or application should be allowed to embed your application as an iframe.
It safeguards your application from clickjacking attacks where an attacker attempts to disguise a malicious element into an application’s own UI element like a link or a button.
How to set up the X-Frame-Options header in a web application
Let’s say you wish to add the X-Frame-Options header to your Apache server. All you need to do is add the following line to your .htaccess file:
This will set the X-Frame-Options header to “DENY”, which will prevent your web page from being embedded in an iframe or frame on any other website.
Benefits of using X-Frame-Options header
As we’ve seen already, X-Frame-Options safeguards your application from clickjacking attacks. They’re also very simple to add using only a few lines (with Apache, a single line) and are supported by most modern browsers like Chrome, Safari, Firefox, etc.
Common use cases for X-Frame-Options header
Besides preventing clickjacking attacks, you can also use X-Frame-Options for protecting sensitive information such as login credentials or financial conditions by preventing them from being displayed in an iframe on an untrusted website.
Remember not to leave this header out, since OWASP recommends X-Frame-Options as a standard for ensuring security for your web application.
Report-URI
You can use the Report-URI header to get feedback on potential security issues in your application. You use it to specify the URI of your server where an application can send reports of security events such as Content Security Policy (CSP) violations, cross-site scripting (XSS) attacks, and other suspicious activities.
How to set up Report-URI header in a web application
You can add Report-URI by specifying the Report-uri headers in your server configuration’s code:
The URI is where security reports will be sent.
Benefits of using Report-URI header
You can use Report-URI to provide a real-time report on security incidents and then use that information to enhance the security of your website. You can also prevent future attacks on your application pertaining to data loss.
Common use cases for Report-URI header
You can use the Report-URI header for monitoring CSP violations, detecting XSS attacks, and further analysing user behaviour on your application. That will help you detect security bottlenecks, fix them beforehand and enhance the overall user experience of your application.
Cookie & Set-Cookie
I’m sure you’ve seen tons of websites that ask you to accept cookies. Almost all applications make use of cookies today to store small and relevant information about their users on the user’s device. On the server, the Cookie header is used to send a cookie back to a client whereas the Set-Cookie header is used on the client side to set or update the value stored against a cookie.
How to set up Cookie and Set-Cookie headers in a web application
The following example sets a cookie named id with a value of a3fWa which expires in the specified date:
The HttpOnly attribute ensures that the cookie can only be accessed by the server and not by client-side scripts, which helps prevent cross-site scripting (XSS) attacks.
Benefits of using Cookie and Set-Cookie headers
Cookies have numerous benefits such as offering personalised content and user experience, storing user’s season details, tracking user behaviour, etc.
Common use cases for Cookie and Set-Cookie headers include
Cookies are used extensively for storing user’s login information which helps with your authentication workflow. Further, they’re used to manage user sessions and prevent unauthorized access to sensitive information on your application.
Authorization
The Authorization header contains the authentication details that are required to verify that a user can access resources from your application.
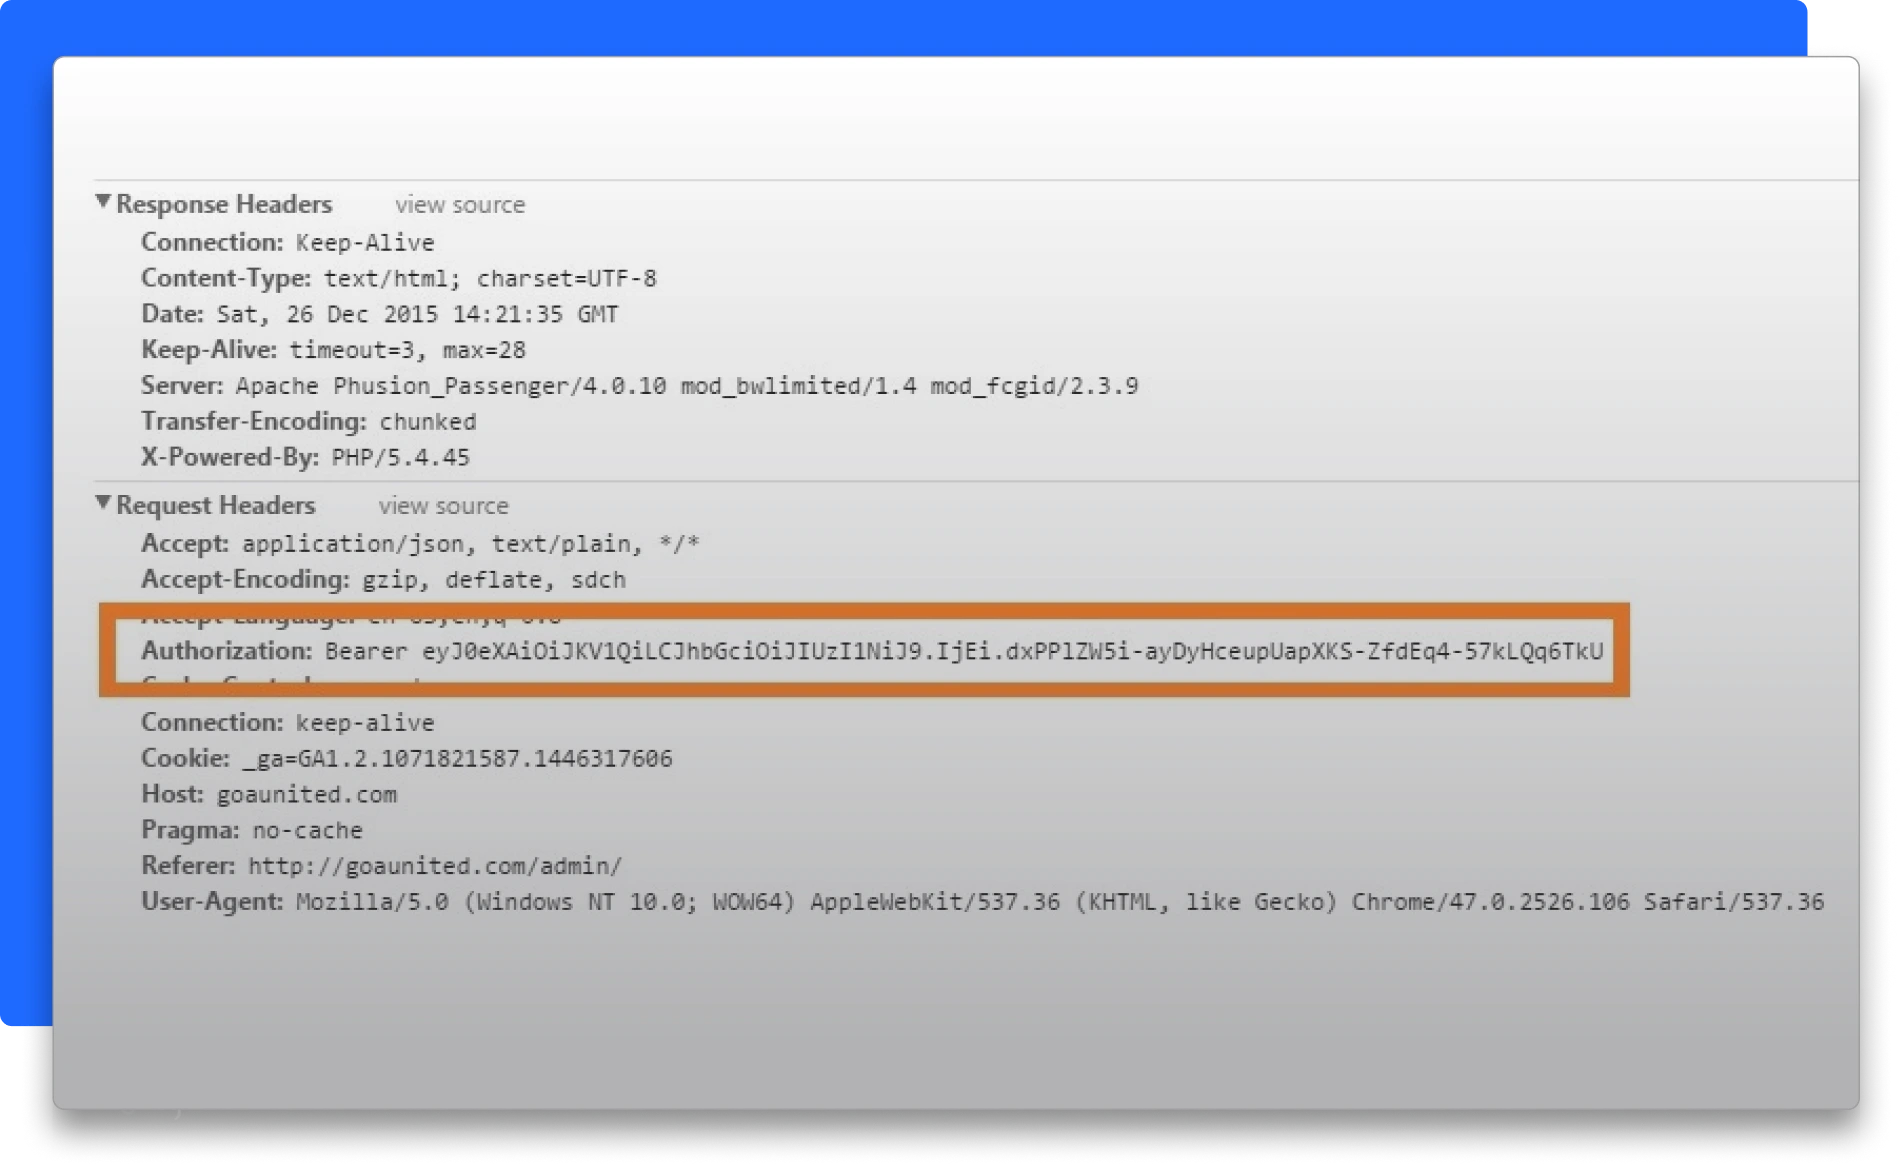
Typically, it represents an access token or API key, depending on how you’ve implemented authentication on your server. These tokens are built on top of a specific authentication scheme like Basic or Bearer. These headers are sent with every request and are then validated on the server side for authentication.
How to set up an Authorization header in a web application
First, you set the Authorization header on the server as a middleware:
Then, you send the Authorization token in the headers of the request from the client-side:
Benefits of using Authorization header
Authorization headers improve the overall security of your application since now each request is validated before granting access to a resource from your server. They are also used to provide access to multiple resources without the need to authenticate each resource separately. Similarly, users don’t have to authenticate themselves every time they request a resource from your server.
Common use cases for Authorization header
Authorization headers are commonly used for accessing server resources, implementing user authentication and Single sign-on (SSO) systems.
SourceMap
Every website has a sourcemap that basically maps the compressed minified bundled code to the original source code. The sourcemap allows developers to debug their compiled code easily since they have a way to trace back production issues to the original source code.
SourceMap header is a response header that can be set by web servers or CDNs (Content Delivery Networks) to provide a URL to a SourceMap file.
How to set up SourceMap header in a web application
Before you set the SourceMap header, make sure that your web application has a sourcemap file generated using your choice of build tools like Webpack, Vite etc.
Then, here’s how you can set up a SourceMap header in your Apache server which points to the URL of your SourceMap file:
Benefits of using SourceMap header
SourceMap headers help you debug your client-side JavaScript applications while keeping the performance and security of your minified JavaScript bundle intact.
Cache-Control

Caching is a great way to boost the performance of your website. You can use the Cache-Control header to specify which resources you want your website to cache and for how long. So the next time whenever your website needs a resource, it will first grab that resource from the cache if it’s available instead of directly making a fresh request to the server.
How to set up Cache-Control header in a web application
Let’s say we want a resource to be cached by public caches for a maximum age of 1 hour or 3600 seconds. We can specify the Cache-Control to be the following:
In this example, the no-referrer-when-downgrade parameter is set, which means that the Referer header is not sent when navigating from an HTTPS page to an HTTP page.
Benefits of using Cache-Control header
Using the Cache-Control header will improve the performance of your application since the amount of data and resources your user needs to download to view a certain page of your application is reduced.
Common use cases for Cache-Control header
Cache-Control header is widely used to cache static assets such as images, CSS and JavaScript files that your website consumes. These are resources that often do not change but are needed readily for your application to function properly.
Referrer-Policy
The Referrer-Policy header is used to control how much information is sent in the Referer header when a user clicks on a link from one website to another. Referrer refers to the URL of the webpage a user was on before they clicked a link to visit the current webpage. The referrer is automatically sent by the user’s browser as part of the HTTP request header.
How to set up a Referrer-Policy header in a web application
To set up the Referrer-Policy header in a web application, you can use the following code in your server-side code:
Benefits of using the Referrer-Policy header
The main benefit of the Referrer-Policy header is limiting the amount of data being sent in the Referrer header. This protects the privacy of your users by reducing the risk of sensitive data leakage.
It also gives you better control over cross-origin requests safeguarding your application of unauthorised access or XSS attacks.
Common use cases for Referrer-Policy header
Primarily, the Referrer-Policy header is used to prevent sensitive information from being leaked in the Referer header, such as user authentication tokens.
Content-Encoding
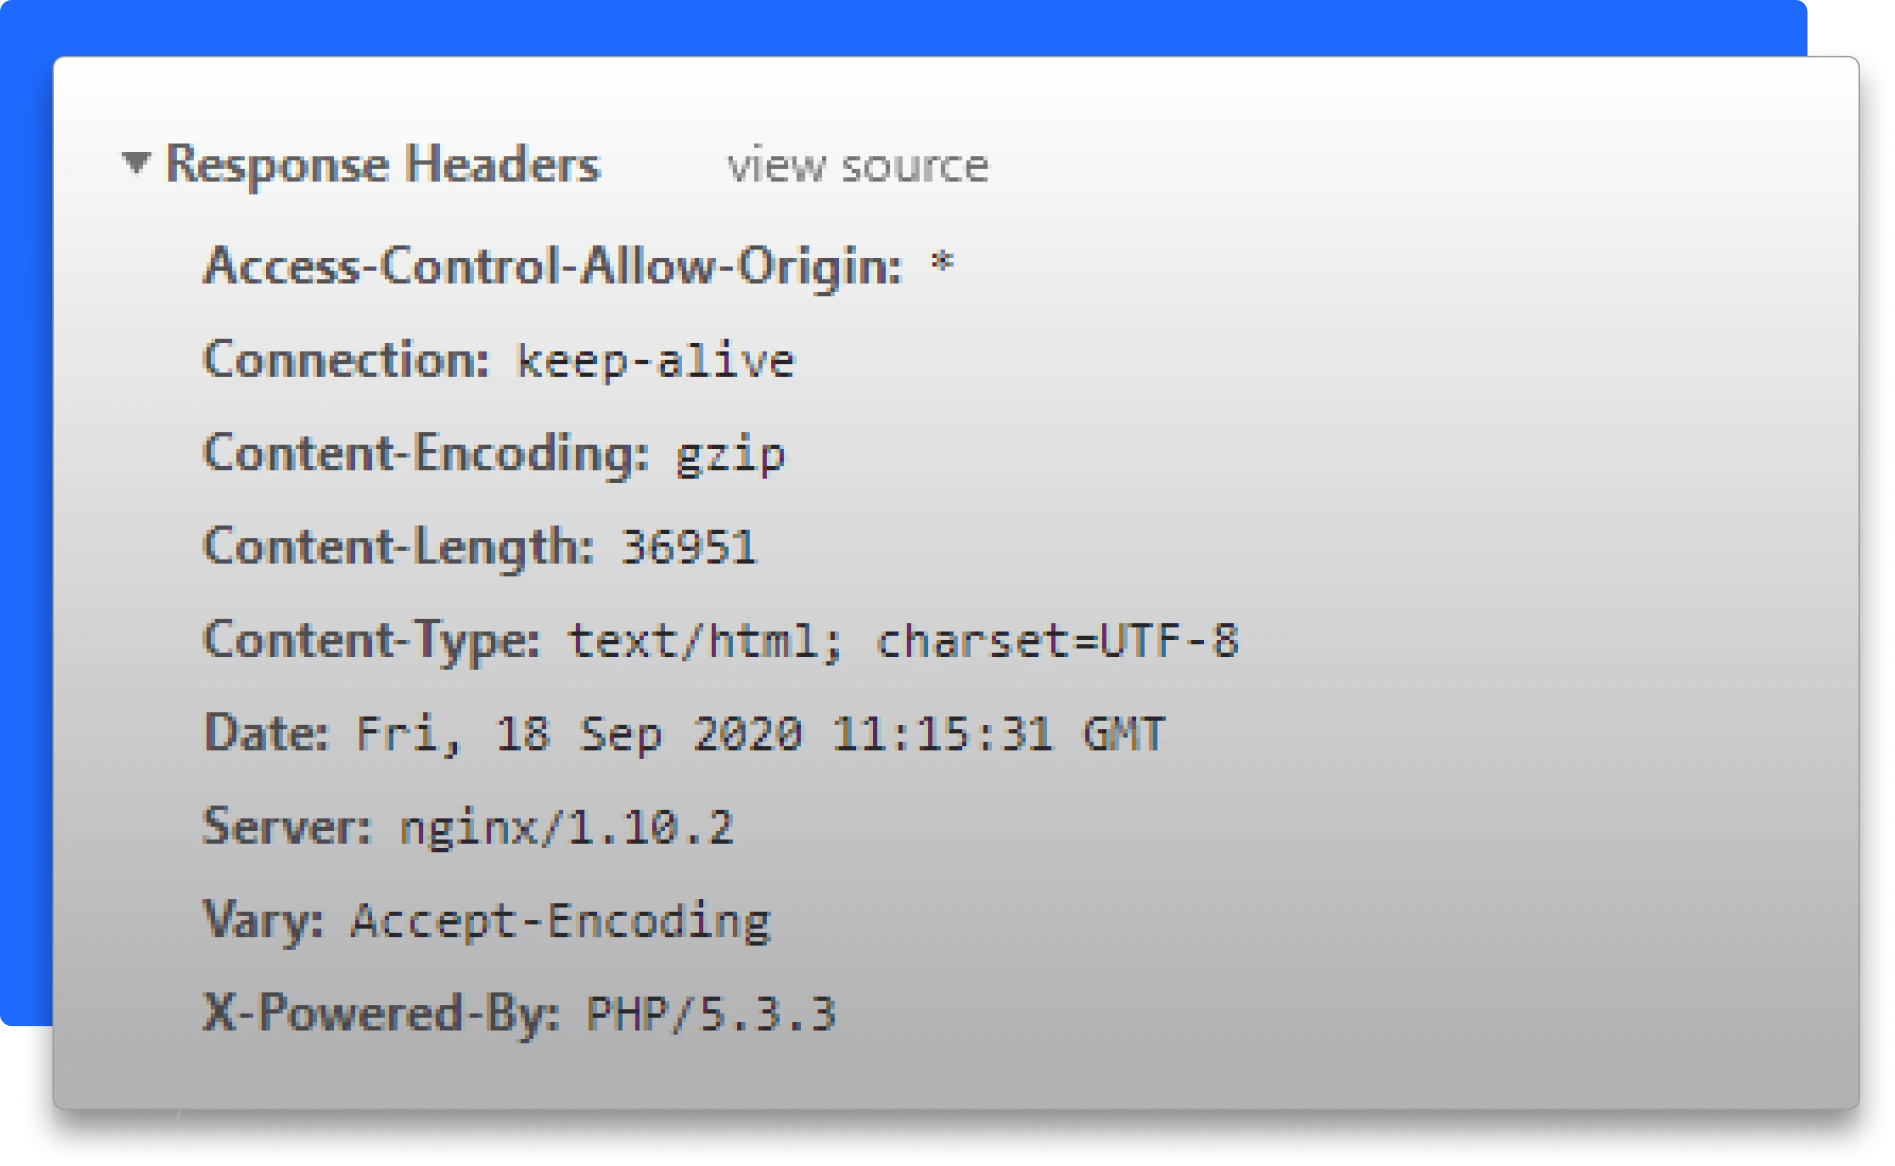
HTTP responses are blazingly fast, even when the data in the response body to be transmitted is large thanks to the default mechanism of compressing the response content. The Content-Encoding HTTP header specified the type of encoding mechanism that needs to be used when compressing the response body. Common encoding methods used are gzip and deflate.
How to set up a Content-Encoding header in a web application
You can configure the server to apply the desired encoding method to all the response body using the Content-Encoding header.
For example, in Node.js, you can use the zlib module to compress the response body and set the Content-Encoding header in the response headers as follows:
This code compresses the largeFile.txt file with gzip and sets the Content-Encoding header in the response headers to indicate that the response is compressed with gzip.
Benefits of using Content-Encoding header
Since compressing the response body reduces the size of the data to be transmitted, the response time of your requests is faster now. Also, the network bandwidth consumed in the request reduces now.
Common use cases for Content-Encoding header
Most commonly the Content-Encoding header is used for compressing HTML,CSS, JavaScript that needs to be transported over via an HTTP request. It’s also used for compressing large files such as audio, high-quality images, and video to reduce the file size and improve load times significantly.
Conclusion
HTTP headers are an essential part of web development. Understanding how they work and how to use them effectively can help improve the security, performance, and user experience of web applications. By experimenting with different headers, you can fine-tune your applications to meet your specific needs and requirements. Not only you can boost your application’s overall performance and user experience, but also ensure air-tight security against common security attacks.
A fun way to work and experiment with these HTTP response headers is using Requestly. It allows you to modify the headers of your APIs and experiment with them. You can learn how to use Requestly by following this tutorial, which will in turn help you gain a deeper understanding of HTTP response headers.


